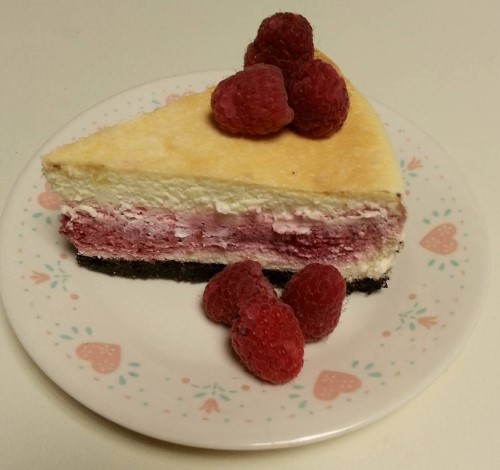
 Here’s the oven version of my Instant Pot Raspberry Cheesecake with a Chocolate Crust. The oven baked version will develop a slightly browned top and have a slightly different texture then one from the Instant Pot but trust me it’s still delicious. I made this in the oven long before I started using my Instant Pot.
This post may contain affiliate links to Amazon or other programs. I do earn a small commission from the sales made through these links; however your price never changes.
Oven Baked Raspberry Filled Cheesecake with Chocolate Crust
Ingredients
Filling:
12 ounces of frozen raspberries
1/2 teaspoon of xanthan gum
1/2 cup sour cream (added after berries have chilled completely)
Crust:
1 cup THM Baking Blend
1/3 cup Swerve Sweetener or 2 TBSP ( 1/8 cup) THM Gentle Sweet
1/3 cup unsweetened baking cocoa, preferred Hershey’s Special Dark
1/8 teaspoon THM Himalayan Mineral Salt
6 1/2 TBSP unsalted butter, melted
Cheesecake Batter:
1 1/2 cup of Swerve Sweetener or 9 TBSP (1/2 cup + 1 TBSP) THM Gentle Sweet
2 – 8 ounce package Cream Cheese, room temperature (1/3 less fat works too
4 eggs, room temperature
1 1/2 cups sour cream
3/4 TSP of xantham gum
1 TSP pure organic Vanilla
Instruction:
- Cook frozen raspberries over medium heat, stirring constantly, until they come to a boil (6 to 8 minutes). Add xanthan gum and stir well; continue to cool about 1 minute. Remove from heat, cool 10 minutes. Pour into a bowl, loosely cover, and refrigerate.
- Preheat oven to 325 degrees. Prepare your 9 inch spring-form pan by cutting a parchment paper circle to line the bottom. I remove the bottom and trace around it with a pencil; cut the circle by cutting inside the line. Reassemble your spring form pan and lightly spray the bottom with coconut oil spray. Lay down your parchment paper circle and smooth out.
- Mix the THM Baking Blend, unsweetened baking cocoa, mineral salt and sweetener in a medium bowl. Blend well, using a small whisk helps. Once mixed well add the melted butter and mix with a fork until you get a nicely coated, crumbly consistency. Press into the bottom of your prepared 9 inch spring form pan. Bake in preheated oven for 10 minutes. Remove from oven and cool on a cooling rack.
- Combine cream cheese and sweetener in a large mixing bowl. Beat at low speed, scraping the bowl often, until creamy. Add eggs, one at a time, beat only until incorporated.
- Once the eggs are incorporated add the 1 1/2 cups of sour cream and 3/4 teaspoon of xanthan gum, mix very well scraping the sides. Stir in the vanilla.
- Quickly prepare your raspberry filling by incorporating 1/2 cup of sour cream into your cooked, cooled raspberries. Mix well.
- Pour half of your cheesecake batter into your prepared pan with the cooled crust. Spread out evenly.
- Gently top with raspberry and sour cream filling; gently spreading the filling out evenly to about 1/4 inch from edge.
- Top with remaining cheesecake batter, smooth out. The back of a soup spoon works well to smooth out the layers.
- Bake for 60 to 70 minutes or until just set about 2 inches from the edge of your spring form pan.. Turn off oven; leaving the cheesecake in oven for 2 hours.
- Remove from oven. Loosen the sides of the cheesecake by running a thin knife all the way around the inside edge. Loosely cover and refrigerate 8 hours or overnight.
- Loosen the cheesecake by gently running a knife around the edge; gently unlock the spring band. You can gently use a thin spatula to separate the cheesecake from the parchment paper and pan bottom coaching it onto a pretty serving plate.
- Serves: 16
- Calories: 235
- Fat: 19g
- Carbohydrates: 11g
- Sodium: 185mg
- Fiber: 4g
- Protein: 7g
- Cholesterol: 85mg
- 12 ounces raspberries, frozen
- ½ teaspoon xanthan gum
- ½ cup sour cream
- 1 cup THM Baking Blend
- ¼ cup THM Gentle Sweet
- ⅓ cup unsweetened cocoa powder (cocoa, preferred Hershey's Special Dark)
- ⅛ teaspoon THM Himalayan High Mineral Salt
- ⅜ cup unsalted butter (melted)
- ½ cup THM Gentle Sweet
- 16 ounces cream cheese, low fat (room temperature)
- 4 eggs (room temperature)
- 1½ cups sour cream (room temperature)
- ¾ teaspoon xanthan gum
- 1 teaspoon vanilla extract
- Bring eggs, cream cheese and 1½ cups of sour cream to room temperature.
- Preheat oven to 325 degrees. Prepare your 9 inch spring-form pan by cutting a parchment paper circle to line the bottom. I remove the bottom and trace around it with a pencil; cut the circle by cutting inside the line. Reassemble your spring form pan and lightly spray the bottom with coconut oil spray. Lay down your parchment paper circle and smooth out.
- Cook frozen raspberries over medium heat, stirring constantly, until they come to a boil (6 to 8 minutes). Add xanthan gum and stir well; continue to cool about 1 minute. Remove from heat, cool 10 minutes. Pour into a bowl, loosely cover, and refrigerate.
- Mix the THM Baking Blend, unsweetened baking cocoa, mineral salt and sweetener in a medium bowl. Blend well, using a small whisk helps. Once mixed well add the melted butter and mix with a fork until you get a nicely coated, crumbly consistency. Press into the bottom of your prepared 9 inch spring form pan. Bake in preheated oven for 10 minutes. Remove from oven and cool on a cooling rack.
- Combine cream cheese and sweetener in a large mixing bowl. Beat at low speed, scraping the bowl often, until creamy. Add eggs, one at a time, beat only until incorporated.
- Once the eggs are incorporated add the 1½ cups of sour cream and ¾ teaspoon of xanthan gum, mix very well scraping the sides. Stir in the vanilla.
- Quickly prepare your raspberry filling by incorporating ½ cup of sour cream into your cooked, cooled raspberries. Mix well.
- Pour half of your cheesecake batter into your prepared pan with the cooled crust. Spread out evenly.
- Gently top with raspberry and sour cream filling; gently spreading the filling out evenly to about ¼ inch from edge. Top with remaining cheesecake batter, smooth out. The back of a soup spoon works well to smooth out the layers.
- Bake for 60 to 70 minutes or until just set about 2 inches from the edge of your spring form pan.. Turn off oven; leaving the cheesecake in oven for 2 hours.
- Remove from oven. Loosen the sides of the cheesecake by running a thin knife all the way around the inside edge. Loosely cover and refrigerate 8 hours or overnight.
- Loosen the cheesecake by gently running a knife around the edge; gently unlock the spring band. You can gently use a thin spatula to separate the cheesecake from the parchment paper and pan bottom coaching it onto a pretty serving plate.