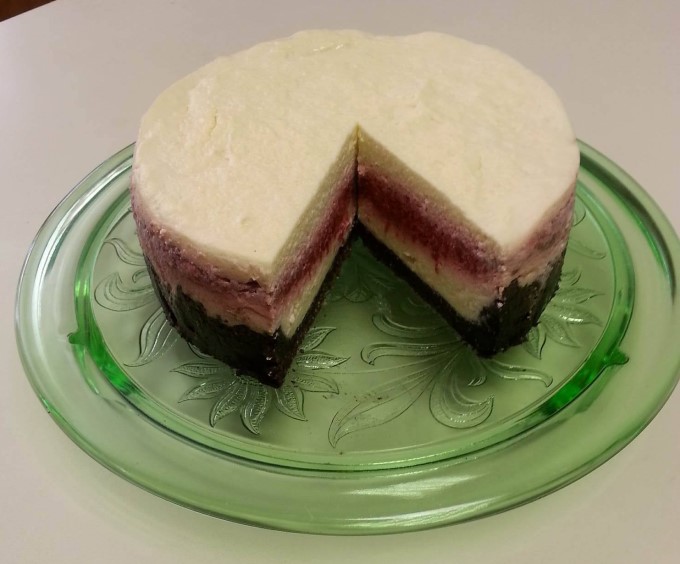
One of our favorite desserts is cheesecake and it’s a blessing that we can have this delight on the Trim Healthy Mama Plan. This Instant Pot Raspberry Cheesecake with a Chocolate Crust is the perfect dessert for a special occasion or family get together. This cheesecake recipe is a bit lighter and creamier than most. Did I mention that the crust resembles the flavor of Oreo cookies? Yep, it does without all the sugar and junk. This cheesecake keeps very well covered in the refrigerator allowing you to prepare a few days ahead.
This post may contain affiliate links to Amazon or other programs. I do earn a small commission from the sales made through these links; however your price never changes.
For this Instant Pot cheesecake I used the Fat Daddio 6 x 3 inch Cheesecake Pan with a removable bottom. It was the perfect size for the recipe volume allowing for a great definition between the layers.
Instant Pot Raspberry Cheesecake with Chocolate Crust
Ingredients:
Filling:
6 ounces of frozen raspberries
1/8 teaspoon of xanthan gum
1/4 sour cream (added after berries have chilled completely)
Crust:
Scant 3/4 cup of THM Baking blend
1/4 cup of Swerve Sweetener or 1 TBSP + 1 TSP THM Gentle Sweet
1/4 cup of unsweetened baking cocoa, preferred Hershey’s Special Dark Cocoa
Generous Pinch of THM Himalayan Mineral Salt
4 TBSP of melted unsalted butter
Cheesecake Batter:
3/4 cup of Swerve Sweetener or 4 TBSP of THM Gentle Sweet
1 – 8 ounce package Cream Cheese, room temperature (1/3 less fat works too)
2 eggs, room temperature
3/4 cup sour cream
1/4 TSP of xanthan gum
1/2 TSP Pure Organic Vanilla
Instructions:
- Cook frozen raspberries over medium heat, stirring constantly, until they come to a boil (4 to 5 minutes). Add xanthan gum and stir well – continue to cook about 1 minute. Remove from heat, cool 10 minutes. Pour into a bowl, loosely cover, and refrigerate.
- Preheat oven to 350 degrees. Prepare your pan by using the center removable plate in the Fat Daddio 6 x 3 inch Cheesecake Pan. Trace a circle on parchment paper. Cut out the circle; add the removable bottom back to the pan and spray very lightly with a coconut oil spray. This will keep the parchment paper adhered to the pan bottom. Lay the parchment circle in your pan, smooth out.
- Mix THM Baking Blend, unsweetened baking cocoa, mineral salt and sweetener in a medium bowl. Blend well, using a small whisk helps. Once the dry ingredients are mixed well add the melted butter and mix with a fork until you get a nicely coated, crumbly consistency. Pour into your prepared cheesecake pan. Press into the bottom of the 6 inch Fat Daddio cheesecake pan. Bake in preheated oven for 10 minutes. Remove from oven and cool on a cooling rack.
- Prepare your Instant Pot by adding 1 cup of water and the rack to the liner. Insert your liner into the instant pot base.
- Create your aluminum foil sling by folding a 15-18 inch piece of aluminum foil into a strip that is about 3-4 inches wide by 15-18 inches long.
- Combine cream cheese and sweetener in a large mixing bowl. Beat at low speed, scraping the bowl often, until creamy. Add eggs, one at a time, beat only until incorporated.
- Once the eggs are incorporated add 3/4 cup of sour cream and 1/4 teaspoon of xanthan gum, gently mix very well scraping the sides.
- Stir in the vanilla.
- Quickly prepare your raspberry filling by incorporating 1/4 cup of sour cream into your cooked, cooled raspberries. Mix well. Set aside.
- Pour half of your cheesecake batter into your prepared pan with the cooled crust. Spread out evenly.
- Gently top with raspberry and sour cream filling; gently spreading the filling out evenly to about 1/4 inch from edge.
- Top with remaining cheesecake batter, smooth out. The back of a soup spoon works well to smooth out the layers.
- Set your cheesecake pan on and center it in your sling; gently lower into the Instant Pot. Slightly fold over the sling ends so that it does not interfere with the lid locking.
- Place the cover on the Instant Pot, lock into place and close venting knob to sealing. Hit [Manual] button; adjust using the [-] button to 25 minutes.
- When the timer beeps allow the pot to NPR (natural pressure release) for 10 minutes. Vent the Instant Pot and carefully remove the cheesecake to a cooling rack.
- Dab any water on the top with the corner of a paper towel. Once you have dabbed up any water on the top and sides gently run a thin knife along the edge all the way around to loosen the cheesecake from the sides. this will lessen the chances of a cracking top.
- Cool completely, about 2 hours; then loosely cover and refrigerate 8 hours or overnight.
- Loosen the cheesecake by gently running a knife around the edge, push up the bottom and slide the cheesecake onto a plate. You can gently use a thin spatula to separate the cheesecake from the parchment paper and pan bottom coaching it onto a pretty serving plate.
We love this cheesecake just lightly garnished with a few fresh raspberries but you could thin some skinny chocolate and a drizzle over the top. Making 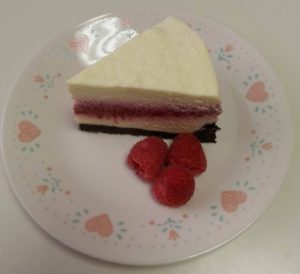 cheesecakes is so much easier and fun using the Instant Pot. The cheesecakes are moister, softer and creamier. Not to mention how much more energy efficient it is over heating up the oven.
Don’t have an Instant Pot? Here’s my oven version: Oven Baked Raspberry Filled Cheesecake with Chocolate Crust. It’s such a beautiful and wonderful dessert that I didn’t want anyone to miss out if they did not own an Instant Pot.
If you are interested in purchasing an Instant Pot here’s the one that I use. It’s the  Instant Pot IP-DUO60 7-in-1 Multi-Functional Pressure Cooker, 6Qt/1000 model. I love this appliance! We use our instant pot at least once a day, usually several times a day, from cheesecakes to hard boiled eggs to pot roast to bone broth. It truly saves me time and energy when prepping meals. It also has high reviews from the users so you don’t have to take just my word for it.
- Serves: 12
- Calories: 198
- Fat: 18g
- Carbohydrates: 9g
- Sodium: 109mg
- Fiber: 4g
- Protein: 5g
- Cholesterol: 75mg
- 6 ounces red raspberries, frozen
- ⅛ teaspoon xanthan gum
- ¼ cup sour cream (added after berries have chilled completely)
- ¾ cup [url href="https://store.trimhealthymama.com/product/gluten-free-baking-blend-16oz-bag/?ref=51" target="_blank"]THM Baking Blend
- 4 Teaspoons THM Gentle Sweet
- ¼ cup baking chocolate, unsweetened (powdered, preferrable a dark cocoa)
- ⅛ teaspoon THM Himalayan Mineral Salt
- ¼ cup unsalted butter (melted)
- ¼ cup THM Gentle Sweet
- 8 ounces cream cheese (room temperature)
- 2 whole eggs (large, room temperature)
- ¾ cup sour cream (room temperature)
- ¼ teaspoon xanthan gum
- ½ teaspoon vanilla extract
- For Raspberry Filling: Cook frozen raspberries over medium heat, stirring constantly, until they come to a boil (4 to 5 minutes). Add xanthan gum and stir well - continue to cook about 1 minute. Remove from heat, cool 10 minutes. Pour into a bowl, loosely cover, and refrigerate.
- Preheat oven to 350 degrees. Prepare your pan by using the center removable plate in the Fat Daddio 6 x 3 inch Cheesecake Pan. Trace a circle on parchment paper. Cut out the circle; add the removable bottom back to the pan and spray very lightly with a coconut oil spray. This will keep the parchment paper adhered to the pan bottom. Lay the parchment circle in your pan, smooth out.
- Chocolate Crust: Mix THM Baking Blend, unsweetened baking cocoa, mineral salt and sweetener in a medium bowl. Blend well, using a small whisk helps. Once the dry ingredients are mixed well add the melted butter and mix with a fork until you get a nicely coated, crumbly consistency. Pour into your prepared cheesecake pan. Press into the bottom of the 6 inch Fat Daddio cheesecake pan. Bake in preheated oven for 10 minutes. Remove from oven and cool on a cooling rack.
- Prepare your Instant Pot by adding 1 cup of water and the rack to the liner. Insert your liner into the instant pot base. Create your aluminum foil sling by folding a 15-18 inch piece of aluminum foil into a strip that is about 3-4 inches wide by 15-18 inches long.
- Cheesecake Batter: Combine cream cheese and sweetener in a large mixing bowl. Beat at low speed, scraping the bowl often, until creamy. Add eggs, one at a time, beat only until incorporated.
- Once the eggs are incorporated add ¾ cup of sour cream, vanilla and ¼ teaspoon of xanthan gum, gently mix very well scraping the sides.
- Quickly prepare your raspberry filling by incorporating ¼ cup of sour cream into your cooked, cooled raspberries. Mix well. Set aside.
- Pour half of your cheesecake batter into your prepared pan with the cooled crust. Spread out evenly.
- Gently top with raspberry and sour cream filling; gently spreading the filling out evenly to about ¼ inch from edge. Top with remaining cheesecake batter, smooth out. The back of a soup spoon works well to smooth out the layers.
- Set your cheesecake pan on and center it in your sling; gently lower into the Instant Pot. Slightly fold over the sling ends so that it does not interfere with the lid locking. Place the cover on the Instant Pot, lock into place and close venting knob to sealing. Hit [Manual] button; adjust using the [-] button to 25 minutes. When the timer beeps allow the pot to NPR (natural pressure release) for 10 minutes. Vent the Instant Pot and carefully remove the cheesecake to a cooling rack.
- Dab any water on the top with the corner of a paper towel. Once you have dabbed up any water on the top and sides gently run a thin knife along the edge all the way around to loosen the cheesecake from the sides. this will lessen the chances of a cracking top.
- Cool completely, about 2 hours; then loosely cover and refrigerate 8 hours or overnight. Loosen the cheesecake by gently running a knife around the edge, push up the bottom and slide the cheesecake onto a plate. You can gently use a thin spatula to separate the cheesecake from the parchment paper and pan bottom coaching it onto a pretty serving plate.
Would love recipe for conventional oven as I don’t have insta pot and won’t be getting one anytime soon. Thank you
Hi Shirley – here’s the oven version: https://www.thehealthymilestone.com/2016/09/10/oven-baked-raspberry-filled-cheesecake-with-chocolate-crust-thm-s/
Unfortunately I tried the link for the conventional own version and it’s coming up “not found” ?. Any suggestions? This looks amazing!
Hi Desiree! Thank you so much for letting me know the link was broken. Here is the correct link for the oven version: https://www.thehealthymilestone.com/oven-baked-raspberry-filled-cheesecake-with-chocolate-crust-thm-s/ I have corrected the link on this page so it should work correctly now.
Hi, I am new to making cheesecake in an Instant Pot and found this recipe. It sounds delicious! I am wondering if you need to cover the pan with foil prior to baking, as many recipes do. I hope to make this soon!
Hi Jeannette – Thank you for commenting. Yes, I do cover my cheesecakes with foil before cooking them. I will edit the instructions as soon as I can.
What about using fresh berries? Would that be a different technique?
I have only used frozen raspberries in this recipe. If using fresh you might want to add a tablespoon water more if needed but sparingly.
Also, in making the raspberry filling, do you NOT add water?
Thanks, this looks really good and I haven’t tried an IP cheesecake yet!
When using frozen raspberries for the filling there is no need to add water.