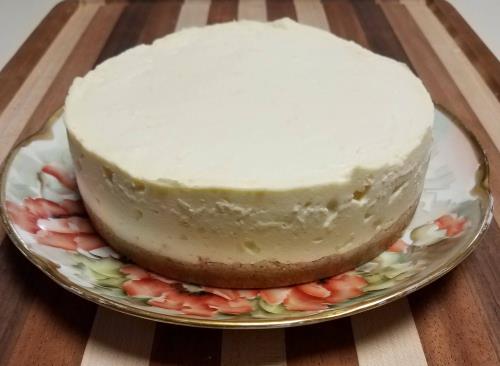
Simple Instant Pot Cheesecake
I’ve always had a love of baking but cheesecakes were one of my specialties, this is how the simple instant pot cheesecake came about. Working as part of the wait staff at a local restaurant, Millard’s at the Summit, our chef and leader Rick Denny was always open for specials and menu ideas from his staff. Rick allowed me to create and bake specialty cheesecakes for the restaurant. This work experience is how my love of creating unique desserts emerged.
This post may contain affiliate links to Amazon or other programs. I do earn a small commission from the sales made through these links; however your price never changes.
It’s awesome creating simple instant pot cheesecakes that fit my Trim Healthy Mama journey. Instant Pot cheesecakes are so moist and creamy. So I hope you enjoy this recipe as much as we do.
Ingredients for the Simple Instant Pot Cheesecake
Crust
3/4 cup THM Baking Blend
2 Tablespoons of Almond Meal
1 Tablespoon plus 1 teaspoon THM Gentle Sweet or 2 teaspoons THM Super Sweet
A few pinches of THM High Mineral Himalayan Salt
4 Tablespoons of melted unsalted butter
1/4 teaspoon of Pure Vanilla Extract
Cheesecake Filling
2 – 8 ounces packages of 1/3 less fat cream cheese
1/4 cup full fat sour cream
6 Tablespoons of THM Gentle Sweet or 3 Tablespoons of THM Super Sweet
2 large eggs
2 tablespoons lemon juice
1 teaspoon of pure Vanilla Extract
1/2 teaspoon of lemon rind (optional)
1/4 teaspoon Xanthan Gum
Instructions
Prep Work:
- Set out all of the cheesecake filling ingredients to bring them to room temperature for best results.
- Preheat oven to 350 degrees.
- Prepare your cheesecake pan – My cheesecake pan of choice is the Fat Daddio 6 x 3 inch Cheesecake Pan. Remove the center plate and set on top of parchment paper to trace a circle. Cut out the circle; place the removable center plate back into the cheesecake pan, and spray very lightly with a coconut oil spray. This will keep the parchment paper adhered to the pan bottom. Lay the parchment circle into your pan, smooth out.
- Now you’re ready to have some IP fun!
Crust Instructions:
- Mix all of the dry ingredients (THM Baking Blend, almond meal, sweetener, and mineral salt) thoroughly in a medium bowl using a small whisk.
- Add the melted butter and vanilla; mix with a fork until you get a nicely coated, crumbly consistency.
- Place the mixture into your prepared 6-inch Fat Daddio cheesecake pan and press evenly into the bottom and out to the edges of the pan.
- Bake in the preheated oven for 7-9 minutes. Remove from oven and allow the pan to cool on a cooling rack while you prepare the filling.
Filling Instructions:
- Place the room temperature cream cheese in a mixing bowl with the THM Gentle Sweet or THM Super Sweet and mix until smooth.
- Add room temperature sour cream, lemon juice, vanilla, and lemon rind (optional); mix until smooth. Stop mixer and scrape the bowl occasionally to ensure your ingredients are well incorporated.
- Add one egg and mix on low until incorporated; add second egg and mix until incorporated. Do not whip or over beat.
- While the mixer is running at a very low speed slowly add the xanthan gum; a tiny bit at a time.
- Lightly spray the sides of the pan with refined coconut oil spray being careful NOT to spray the crust.
- Pour filling onto cooled crust.
- Tightly cover the simple instant pot cheesecake with aluminum foil.
- Add 1 1/2 cups of water to your Instant Pot liner and place the trivet inside the liner.
- Set your cheesecake pan on an aluminum foil sling and lower it onto the trivet inside the liner.
- Put the lid on, lock, set pressure release to sealing. Press [Manual]; adjust time [+/-] to 25 minutes. When the cycle has completed allow the pot to naturally release pressure for 10 minutes; then do a quick pressure release.
- Lift the simple instant pot cheesecake from the liner and place on a cooling rack. Remove the aluminum foil cover; soak up any water spots with the corner of a paper towel. Gently run a butter knife around the edge to free the cheesecake. This will help prevent cracks as it cools. Cool on the counter for 2 hours, then cover the pan with plastic wrap and refrigerator for at least 4 hours or overnight.
- Once thoroughly chilled run a knife along the edge to release and push the base upward to unmold the cheesecake. Transfer to a serving platter.
- Serves: 12
- Calories: 162
- Fat: 14g
- Carbohydrates: 4g
- Sodium: 184mg
- Fiber: 3g
- Protein: 5g
- Cholesterol: 22mg
- ¾ cup THM Baking Blend
- 2 tablespoons almond meal
- 4 teaspoons THM Gentle Sweet
- 1/16 teaspoon THM Himalayan High Mineral Salt
- ¼ cup unsalted butter (melted and cooled)
- ¼ teaspoon vanilla
- 2 large eggs (room temperature)
- 16 ounces cream cheese, low fat (room temperature)
- ¼ cup sour cream
- ⅜ cup THM Gentle Sweet(6 tablespoons)
- 2 tablespoons lemon juice (aprox ½ lemon juiced)
- 1 teaspoon vanilla
- ½ teaspoon lemon rind
- ¼ teaspoon xanthan gum
- Set out all of the cheesecake filling ingredients to bring them to room temperature for best results.
- Preheat oven to 350 degrees.
- Prepare your cheesecake pan - My cheesecake pan of choice is the Fat Daddio 6 x 3 inch Cheesecake Pan. Remove the center plate and set on top of parchment paper to trace a circle. Cut out the circle; place the removable center plate back into the cheesecake pan, and spray very lightly with a coconut oil spray. This will keep the parchment paper adhered to the pan bottom. Lay the parchment circle into your pan, smooth out. Now you're ready to have some IP fun!
- Mix all of the dry ingredients (THM Baking Blend, almond meal, sweetener, and mineral salt) thoroughly in a medium bowl using a small whisk.
- Add the melted butter and vanilla; mix with a fork until you get a nicely coated, crumbly consistency.
- Place the mixture into your prepared 6-inch Fat Daddio cheesecake pan and press evenly into the bottom and out to the edges of the pan.
- Bake in the preheated oven for 7-9 minutes. Remove from oven and allow the pan to cool on a cooling rack while you prepare the filling.
- Place the room temperature cream cheese in a mixing bowl with the THM Gentle Sweet or THM Super Sweet and mix until smooth.
- Add room temperature sour cream, lemon juice, vanilla, and lemon rind (optional); mix until smooth. Stop mixer and scrape the bowl occasionally to ensure your ingredients are well incorporated.
- Add one egg and mix on low until incorporated; add second egg and mix until incorporated. Do not whip or over beat.
- While the mixer is running on a very low speed gradually add the xantham gum a tiny bit at a time.
- Lightly spray the sides of the pan with refined coconut oil spray being careful NOT to spray the crust. Pour filling onto cooled crust.
- Tightly cover the cheesecake with aluminum foil.
- Add 1½ cups of water to your Instant Pot liner and place the trivet inside the liner and place liner in the Instant Pot.
- Set your cheesecake pan on an aluminum foil sling and lower it onto the trivet inside the liner.
- Put the lid on, lock, set pressure release to sealing. Press [Manual]; adjust time [+/-] to 25 minutes. When the cycle has completed allow the pot to naturally release pressure for 10 minutes; then do a quick pressure release.
- Lift the cheesecake from the liner and place on a cooling rack. Remove the aluminum foil cover; soak up any water spots with the corner of a paper towel. Gently run a butter knife around the edge to free the cheesecake. This will help prevent cracks as it cools. Cool on the counter for 2 hours, then cover the pan with plastic wrap and refrigerator for at least 4 hours or overnight.
- Once thoroughly chilled run a knife along the edge to release and push the base upward to unmold the cheesecake. Transfer to a serving platter.
Cheesecake success! The hardest part about this process is the “chill time”. ?
I love everything about this recipe – the simplicity, the taste and texture. Everything about this cheesecake is absolutely spot-on perfect! Thank you Carey Sevier!
Thank you so much Tammy! I am so pleased that you enjoyed this recipe.
I’m making my this tonight to enjoy for Super Bowl tomorrow. Probably with a homemade caramel sauce.
Is there something I can replace the lemon juice with or leave it out? I have no real lemons in the house.
You could leave it out. The lemon juice does help cut the super richness of the cream cheese.
Thanks! I have a little bottled juice.
Carey~ When you set the IP to MANUAL, do you use the High pressure setting, or Low? (My 6″ pan will arrive in a few days… I’m excited to try your recipe! ?)
Hi Beverly!
I always use high pressure when cooking a cheesecake.
I made this cheesecake last night but put it in two pans, so they were smaller. They cooked perfectly. The only problem is that they are BOTH gone now and I want more!!!
Hi Dianne!
I’m so glad that you enjoyed the Simple Cheesecake recipe.
I cannot find the part for the topping. Not sure what the second link is and where to find it. Please help me.
Hi Peggy! Thank you for commenting. This is a very simple cheesecake for the Instant Pot and doesn’t have a cooked topping. I serve it with either crushed slightly sweetened berries or sliced strawberries.
This is one of my favorite recipes! Today I am planning to make it with blueberries inside. Hope it turns out as great as usual!
Can gluccomanan be substituted for xantham gum? Is almond meal different than almond flour?
Thanks!
Yes you can substitute glucomanan for the xanthan gum. Almond meal and almond flour are interchangeable – some almond meals labeled ans flour might be slightly finer.
I want to make this in 4oz canning jars so I can freeze individualy. Any idea on the cooking time, or any other changes for that? TIA!
I would say about 12-15 minutes, 10 minutes NPR and cool completely before freezing.
I don’t have a Insta pot. Can this be cooked in the l oven?
Hi Lynda,
Yes you could cook this in the oven. I would place the pan in a water bath at 350 degrees for approximately 35-40 minutes. Cool completely before refrigerating.
Hi – is there something I can use for the crust that will fit the THM-S category other than nut ingredients? My son can’t have nuts (deathly allergic). Thanks!
If he is not allergic to coconut flour this one would work – http://www.briana-thomas.com/brianas-baking-mix/ If he is allergic to coconut flour you could sub those nut flours with sunflower meal and or pepitas meal.
Can you please tell me what the adjustments would be for an 8×3 Fat Daddio pan?
This recipe will work as is for the 8 x 3 Fat Daddio pan – it will just yield more slices and not be quite as high.
Can i sub the THM supersweet for something else and the THM baking blend for my own blend of coconut & almond flour?
Yes you can sub out the sweetener. IF you baking blend works for other recipes it should work for this crust.
Do you have to use the xantham gum? Could it be omitted?
Yes, you can omit the xanthan gum if you choose not to use it.
My first cheese cake ever. Cooling now. Looks fabulous!
Lisa – I hope you enjoy this recipe.
Love this…have made it twice in the last week! Not new to baking cheesecakes, but new to cooking them in my EPC. Both times I’ve used the EPC the crust seems soggy, even after baking it. Does this happen to you? I normally wrap my springform pans in foil, should I in the pressure cooker also? It’s a tight fit, so not a lot of extra room for foil. Thanks!
Electric pressure cookers cook with steam – moisture. One way to work around the moister crust is to use a one piece silicone pan. But it still won’t be as dry as one baked in the oven.
Thanks, Carey!
I have made this several times, both with regular cream cheese & with the 1/3 fat cream cheese and I am wondering if there is a reason to use one over the other? It seems like we might have liked the full fat a bit better. Thanks for the yummy recipe!!
Hi Kari!
I am so glad you are enjoying this recipe. I have made this recipe with full fat, 1 of each and or all 1/3 less fat cream cheese. Yes, I agree that using full fat cream cheese may taste a bit better but using the 1/3 less fat does decrease the calorie load. When I use the full fat cream cheese I just serve a smaller portion. I love that we get to choose Food Freedom with THM!
Mine is very jiggly. Should I cook it longer? I’ve never made one before.
Hi Natalie – Cheesecakes will be a bit jiggly in the very center when they first come out of the Instant Pot. If you fee it’s runny then I would cook an additional 5 minutes.
Hi – I only have a bigger pan and it still turned out fantastic. If I wanted to to double the filling next time, how long would you bake it?
Janet – are you using your Instant Pot or baking in the oven and what size pan are you using?
Can I use a springform pan?
Yes, you can use a springform pan as long as it will hold the ingredients and it will fit within the liner with some space around the pan.
What size IP is this recipe for? I have an 8 quart IP and wonder if any measurements or timing needs to change.
Hi Veronica,
This recipe has been tested in the following pots – DUO 60, DUO Plus, DUO Ultra (6 quart pots) plus the DUO 80 (8 quart). The timing worked for all four of these pots.
Thank you! I can’t wait to try it!
Can I use Greek Yogurt instead of S Cream? I don’t have any at the moment.
You can use Greek yogurt but I would advise full fat yogurt.
It looks really good, however my biggest pet peeve is so many people use ingredients the most people don’t carry normally in their kitchen. Is there a way you can “dumb” it down?
Hi Denise!
I love THM’s products but you can make a DIY baking blend using equals parts of almond flour, flax meal and coconut flour – all are available at most grocery stores. For the sweetener you can substitute either Pyure, Truiva, Lakanto or Swerve depending on which brand your grocery store carries.